8.2 Your First Container
From Installation to Action
You’ve got Docker or Podman installed - now comes the exciting part: running your first container. This isn’t just a “hello world” exercise; we’ll explore what’s actually happening behind the scenes and build practical skills you’ll use every day.
By the end of this section, you’ll understand how containers start, how they differ from traditional processes, and how to inspect and manage them effectively.
Learning Objectives
By the end of this section, you will:
Run your first container and understand what happens during execution
Explore container internals using inspection and debugging commands
Manage container lifecycle (start, stop, remove, list)
Understand container networking and port mapping basics
Build confidence with essential container management commands
Prerequisites: Completed container platform installation from the previous section
The Classic “Hello World”
Your First Command
Let’s start with the most famous container command in the world:
# Docker users:
docker run hello-world

# Podman users:
podman run hello-world
What Just Happened?
When you ran this command, several important things occurred:
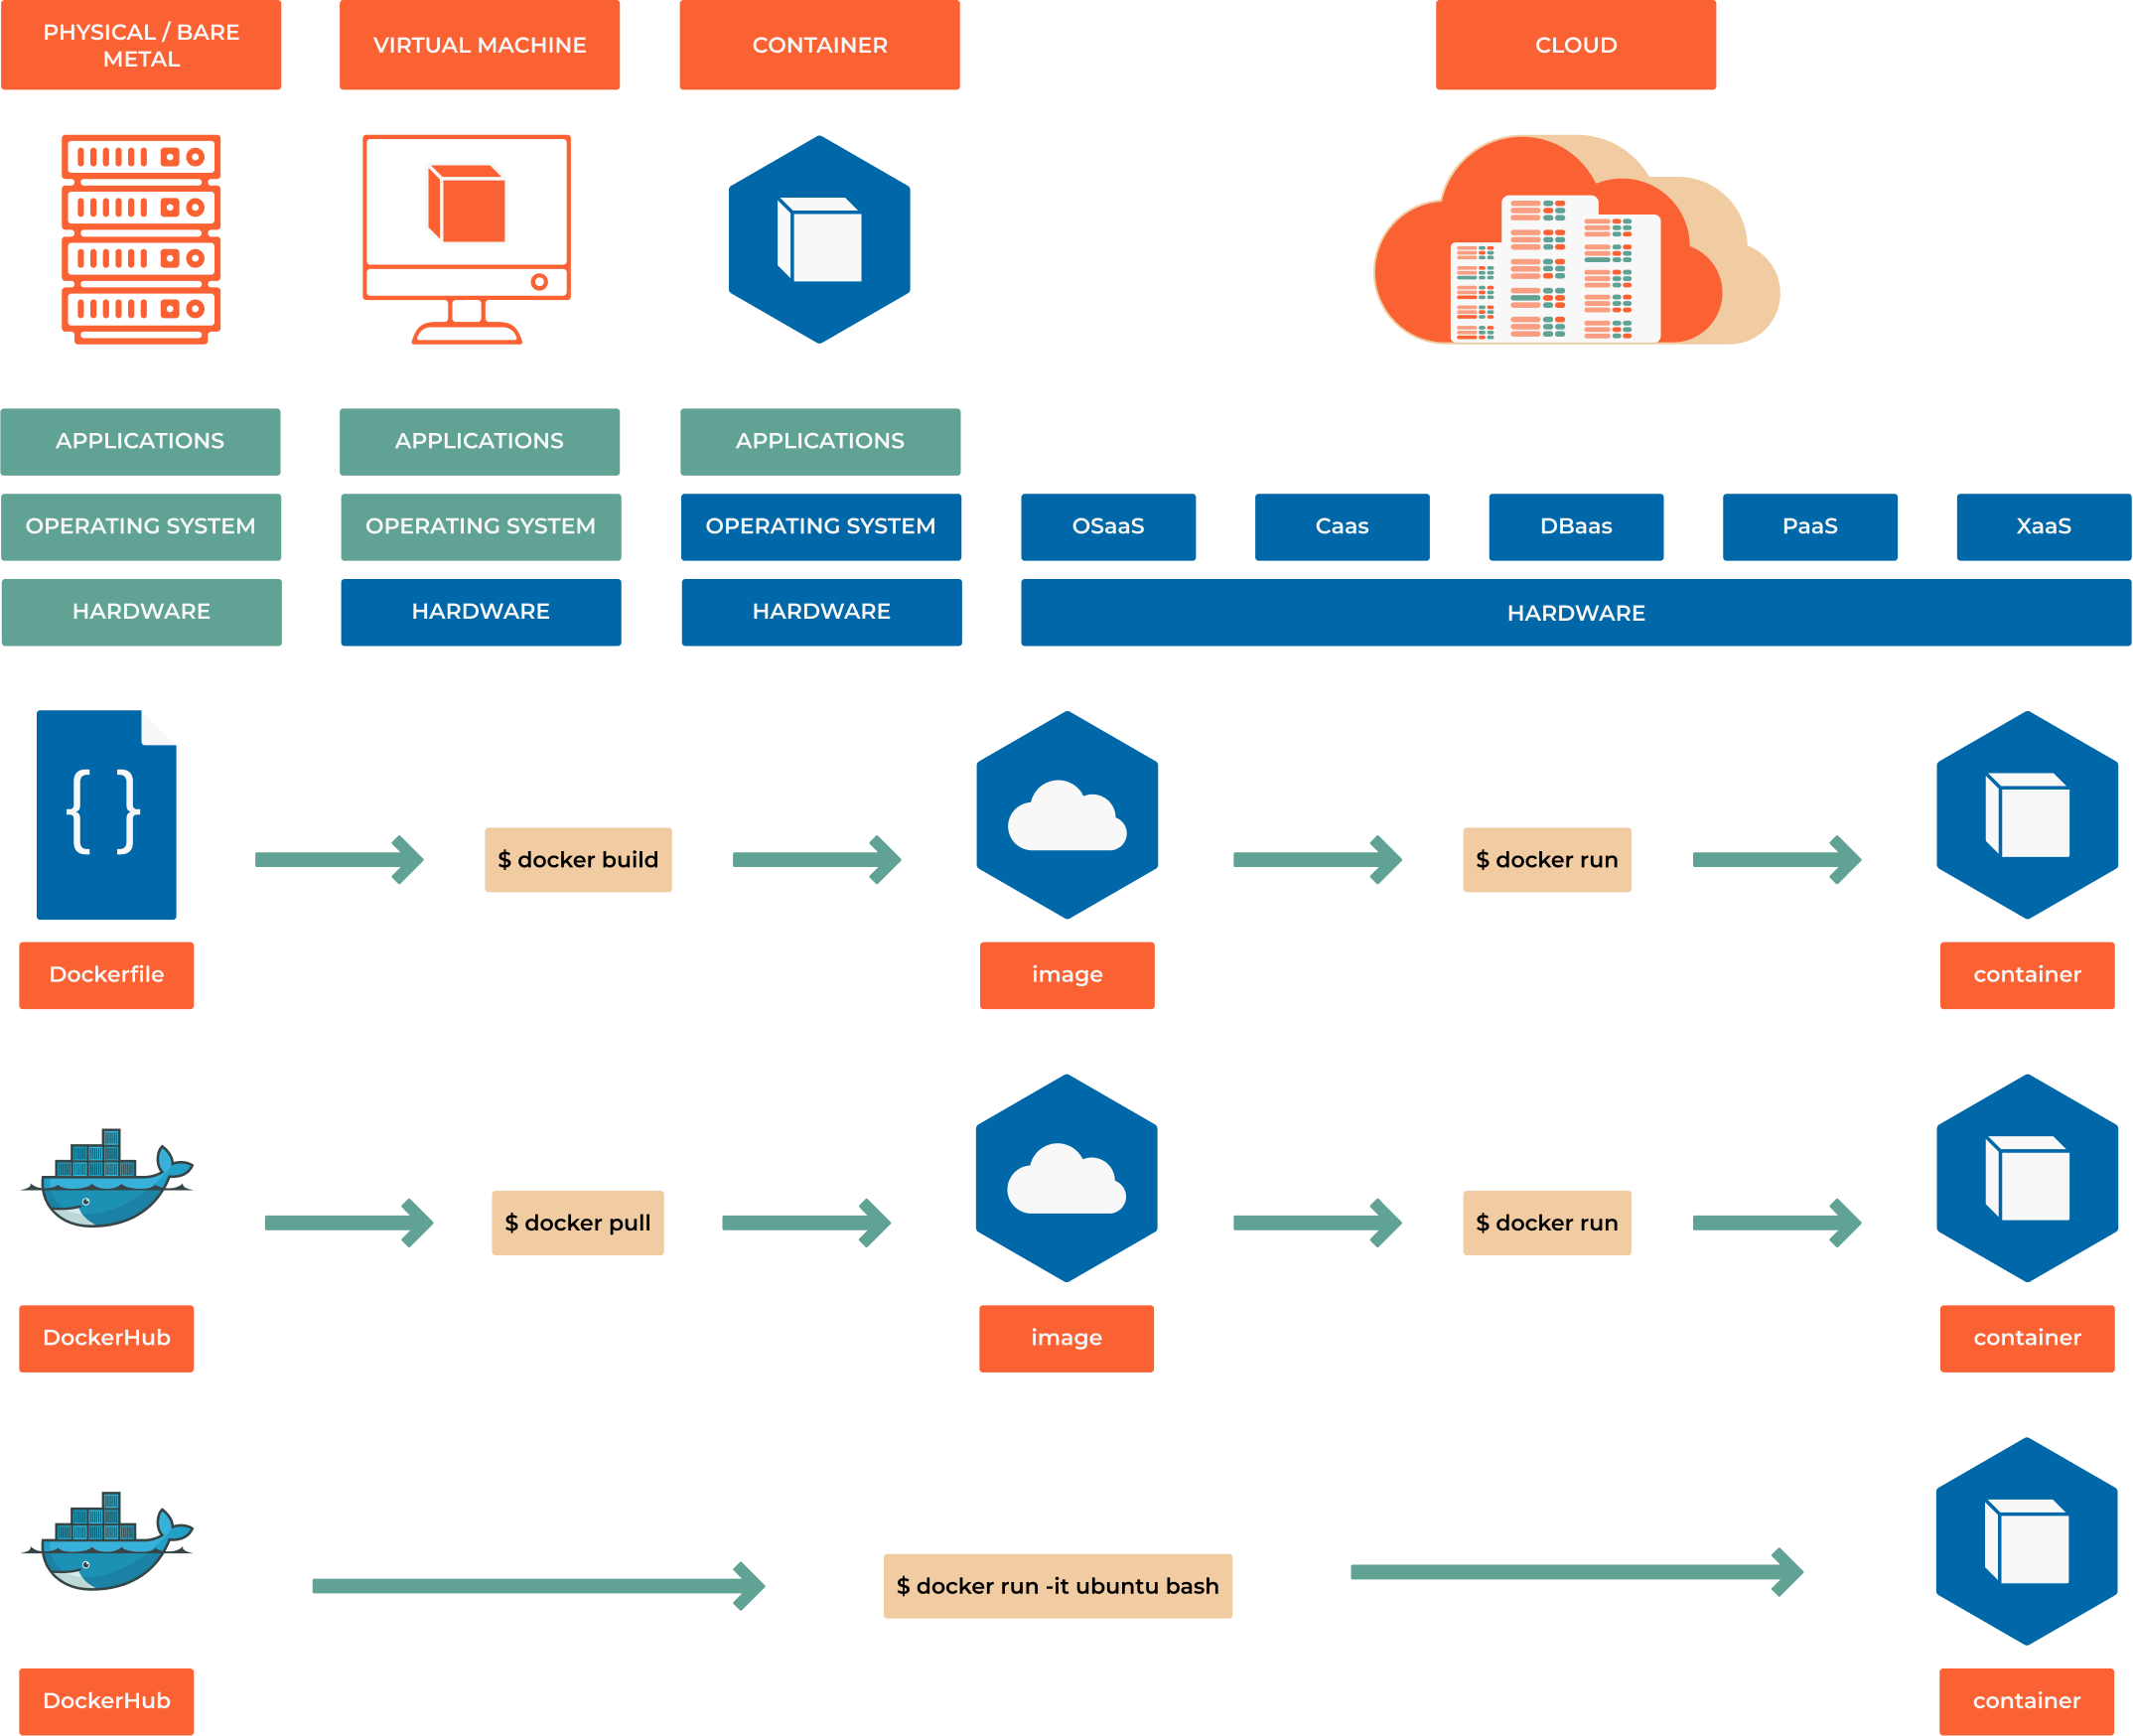
Image Pull: The platform downloaded the hello-world image from the registry
Container Creation: A new container was created from that image
Process Execution: The container ran its default command
Output Display: The program printed a message and exited
Container Termination: The container stopped (but still exists)
The Output Explained:
Hello from Docker!
This message shows that your installation appears to be working correctly.

To generate this message, Docker took the following steps:
 1. The Docker client contacted the Docker daemon.
 2. The Docker daemon pulled the "hello-world" image from the Docker Hub.
 3. The Docker daemon created a new container from that image which runs the
    executable that produces the output you are currently reading.
 4. The Docker daemon streamed that output to the Docker client, which sent it
    to your terminal.
This simple example demonstrates the entire container lifecycle in action.
Understanding What Happened
Behind the Scenes
Let’s verify what actually occurred and learn essential management commands:
# List all containers (including stopped ones)
docker ps -a
# or: podman ps -a
You should see output similar to:
CONTAINER ID   IMAGE         COMMAND    CREATED         STATUS                     PORTS     NAMES
abc123def456   hello-world   "/hello"   2 minutes ago   Exited (0) 2 minutes ago             inspiring_newton
Key Information Revealed:
Container ID: Unique identifier (abc123def456)
Image: Source image used (hello-world)
Command: What the container executed (/hello)
Status: Current state (Exited with code 0 = success)
Names: Random name assigned (inspiring_newton)
Inspect Container Details:
# Get detailed container information (replace with your container ID)
docker inspect abc123def456
# or: podman inspect abc123def456
This reveals everything about the container: network settings, mounted volumes, environment variables, and more.
Interactive Containers
Beyond Hello World
Let’s run something more interesting - an interactive Linux container:
# Run an Ubuntu container with interactive terminal
docker run -it ubuntu:22.04 /bin/bash
# or: podman run -it ubuntu:22.04 /bin/bash
Command Breakdown:
run: Create and start a new container
-i: Keep STDIN open (interactive)
-t: Allocate a pseudo-TTY (terminal)
ubuntu:22.04: Use Ubuntu 22.04 LTS image
/bin/bash: Run bash shell instead of default command
Inside the Container:
Once inside, you’re in a complete Linux environment:
# Check the operating system
cat /etc/os-release

# See running processes
ps aux

# Check available disk space
df -h

# Install software (try it!)
apt update && apt install -y curl

# Test network connectivity
curl -s https://httpbin.org/ip

# Exit the container
exit
What’s Fascinating Here:
You’re in a complete Ubuntu system, but it started in seconds
It’s isolated from your host operating system
You can install software without affecting your host
When you exit, all changes are lost (unless saved)
Container Management
Essential Lifecycle Commands
Listing Containers:
# Show running containers only
docker ps

# Show all containers (running and stopped)
docker ps -a

# Show container sizes
docker ps -s

# Custom formatting
docker ps --format "table {{.Names}}\t{{.Status}}\t{{.Image}}"
Starting and Stopping:
# Start a stopped container
docker start container_name_or_id

# Stop a running container gracefully
docker stop container_name_or_id

# Force stop a container
docker kill container_name_or_id

# Restart a container
docker restart container_name_or_id
Connecting to Running Containers:
# Execute commands in running containers
docker exec -it container_name /bin/bash

# Run a single command
docker exec container_name ls -la /app

# Check container logs
docker logs container_name

# Follow logs in real-time
docker logs -f container_name
Container Cleanup:
# Remove a stopped container
docker rm container_name_or_id

# Remove multiple containers
docker rm container1 container2 container3

# Remove all stopped containers
docker container prune

# Force remove a running container
docker rm -f container_name
Running Web Applications
A Real-World Example
Let’s run a web server to understand networking:
# Run nginx web server with port mapping
docker run -d -p 8080:80 --name my-web-server nginx:alpine
# or: podman run -d -p 8080:80 --name my-web-server nginx:alpine
Command Explanation:
-d: Run in detached mode (background)
-p 8080:80: Map host port 8080 to container port 80
–name my-web-server: Give the container a friendly name
nginx:alpine: Use lightweight Alpine-based nginx image
Test Your Web Server:
# Check if container is running
docker ps

# Test the web server
curl http://localhost:8080

# Or open in your browser: http://localhost:8080
Modify the Web Content:
# Copy a file into the running container
echo "<h1>Hello from my container!</h1>" > index.html
docker cp index.html my-web-server:/usr/share/nginx/html/index.html

# Refresh your browser to see the change
Monitor the Container:
# Watch resource usage
docker stats my-web-server

# View logs
docker logs my-web-server

# Execute commands inside
docker exec -it my-web-server /bin/sh
Image Management Basics
Understanding Images vs Containers
Images are templates; containers are running instances:
# List downloaded images
docker images
# or: docker image ls

# Pull an image without running it
docker pull python:3.11-slim

# Remove an image
docker rmi image_name:tag

# Remove unused images
docker image prune
Image Information:
# Inspect an image
docker inspect nginx:alpine

# View image layers and history
docker history nginx:alpine

# Show image disk usage
docker system df
Debugging and Inspection
When Things Go Wrong
Container Won’t Start:
# Check what went wrong
docker logs container_name

# Run container interactively to debug
docker run -it --entrypoint /bin/sh image_name

# Inspect container configuration
docker inspect container_name
Performance Issues:
# Monitor resource usage
docker stats

# Check system resource usage
docker system df

# View container processes
docker top container_name
Network Connectivity:
# List networks
docker network ls

# Inspect network configuration
docker network inspect bridge

# Test connectivity from inside container
docker exec -it container_name ping google.com
Practical Exercises
Exercise 1: Run a Database
# Run PostgreSQL database
docker run -d \
  --name my-postgres \
  -e POSTGRES_PASSWORD=mypassword \
  -e POSTGRES_DB=testdb \
  -p 5432:5432 \
  postgres:15

# Connect to the database
docker exec -it my-postgres psql -U postgres -d testdb
Exercise 2: Multi-Container Setup
# Run Redis cache
docker run -d --name my-redis redis:alpine

# Run a Python app that connects to Redis
docker run -d \
  --name my-app \
  --link my-redis:redis \
  -p 5000:5000 \
  python:3.11-slim \
  python -c "
import time
import redis
r = redis.Redis(host='redis', port=6379)
while True:
    r.incr('visits')
    print(f'Visits: {r.get(\"visits\").decode()}')
    time.sleep(5)
"
Exercise 3: Container Cleanup Challenge
# Create several test containers
docker run -d --name test1 nginx:alpine
docker run -d --name test2 redis:alpine
docker run -d --name test3 postgres:15

# Stop all test containers
docker stop test1 test2 test3

# Remove all test containers
docker rm test1 test2 test3

# Verify cleanup
docker ps -a
Best Practices
Container Naming:
# Good: Descriptive names
docker run --name web-frontend nginx
docker run --name api-backend python:3.11
docker run --name cache-redis redis

# Bad: Default random names
docker run nginx  # Gets name like "elegant_einstein"
Resource Management:
# Limit memory and CPU
docker run -m 512m --cpus="1.0" nginx

# Set restart policy
docker run --restart=unless-stopped nginx
Regular Cleanup:
# Weekly cleanup routine
docker container prune  # Remove stopped containers
docker image prune      # Remove unused images
docker volume prune     # Remove unused volumes
docker network prune    # Remove unused networks

# Or clean everything unused
docker system prune -a
What’s Next?
You’ve mastered the basics of running and managing containers. In the next section, we’ll learn how to create your own container images using Dockerfiles, transforming your applications into portable, shareable containers.
Key takeaways:
Containers are lightweight, isolated processes
They start quickly and can be managed easily
Port mapping enables network access to containerized services
Container lifecycle management is essential for effective development
Images are templates; containers are running instances
Note
Practice Makes Perfect: The commands you’ve learned in this section form the foundation of daily container work. Practice them regularly until they become second nature.